* For expert level shooting, it takes; at the least, 15 minutes to learn the techniques.
* For Professional level shooting, it takes shooting up to 1 boxes of ammunition.
* For Master shooting, it takes shooting up to 100 boxes of ammunition.
When learning how to shoot rifles and handguns, Perform these procedures firstly:
* Practise putting the safety on and off.
* Practise holding the gun. For a rifle, place the end of the stock in the middle of your shoulder; or at the end of your shoulder. If placing the stock in the middle, place your elbow straight out; and, level to the ground. If placing the stock near the end of your shoulder, place your elbow 45 degree angle from the ground; and, aimed downwardsly. Holding a pistol requires firmly holding it with your trigger hand; then, placing your other hand the same way as your trigger hand; or, under your trigger hand. Do NOT hold tightly. This hand is only used to steady the gun.
* practise aiming the gun. For rifles, it is important to place your face exactly in the same place every time. If not, the accuracy will be affected. Many people place their face in different places; and, are not accurate when shooting. For pistols, it is best to hold the pistol in a very convenient level to allow easy looking through the sights.
* Relax when holding the gun. For rifles, grip firmly with the shooting hand [the hand that is used on the trigger]. Grip with the other hand lightly; but firmly. Pull the rifle into your shoulder with the trigger hand. Do not hold onto the gun tightly. Push your shoulder into the gun stock.
* Learn to to clean the gun. A clean gun shoots more accurately than a dirty gun. Not cleaning the gun may cause a malfunction; or, for the barrel to explode.
* After mastering your body with the gun; and your gun, practice aiming in different angles, heights; and, levels.
* When ready to shoot, load only 1 single bullet in your gun. Shoot at a safe target away from people, houses; or, places animals or people may be located. Loading one round prevents accidental shooting if you panic.
* When accustomed to the gun, load multiples of rounds in the gun. Practise adjusting your sights.
Remember these important facts:
* Always aim the gun upwardsly. Do NOT aim it at anyone; or, towards the ground. If the gun accidentally fires, it may kill someone. If aimed at the ground, it may cause a fatal ricochet off of a rock or hard surface.
NOTE: If your rifle recoils too heavily, a pad may be used to absorb recoil. The pad is called a "Recoil Pad". There are many models; but, only a few will fit your gun; unless you purchase a Universal model.
Here are some things to know when shooting:
* If you tense too much, you will shake; and affect your shooting. Hold your gun firmly; but, not tightly.
* If a pistol recoils heavily, bring your wrist upwardsly first; then, bring your entire arms over your head. Do NOT fight the gun; or, allow it to strike your head. When shooting a large caliber pistol, wear a motorcycle helmet; or, other head protection.
The Mandatory skills for good shooting are:
* Know your body: Know what your body can do when holding a rifle, pistol or shotgun. Practise exercising with your gun until it feels light to hold.
* Learn your gun inside and out: Be accustomed to the feel of shooting it before fine tuning it. Shoot a few boxes at a target. Do not aim. Just feel the gun.
* Learn to adjust your sights: Practise adjusting your sights every time you shoot. Weather conditions will affect your sights. If your sights seem to go out of accuracy, it is probably due to wind conditions; or, other conditions that severely affect your sight alignment.
* Use the BRASS technique:
Breathe: Breathe calmly, take a moderate breath, gently exhale; then, hold your breath. Do not
exhale all of your breath; just, empty your lungs. That will prevent shaking. Too much exhaling
will cause you to shake.
Relax: Do not hold the gun tightly; just firmly.
Aim : Ensure your facial placement is exactly the same as your best shooting; or, what is most
comfortable. This is extremely important for good shooting.
Slack: Gently take the slack out of your trigger. In the future, you may have a gunsmith adjust the
trigger to take out the slack. That is called a "Hairpin" trigger.
Squeeze: Gently squeeze. Do NOT jerk the trigger. Jerking the trigger will move your gun slightly;
and cause accuracy to be affected.
These techniques are used by professional shooters; including Sniper, CounterSnipers and Master shooters.
Snipers and counterSnipers are professional who do not require extreme accuracy of Match shooters. Here is the difference:
* Match Shooters: These shooters require exact placement of the bullet in the target. In the early times, the shooters wererequired to place one hole shots; or, cluster shots. There was competition above Match shooters that did not allow cluster shots; but, that type of shooting no longer exists.
A cluster shot is a shooting that leaves indentations on an existing hole. The shots enter the same hole;but, not in the exact same place. Match shooters shoot very slowly; but, accurately; unless they are top shooters.
* Snipers: A Sniper is a combat shooter who is a shooting specialist. The Sniper is very easily killed due to the 3-10 second delay between shooting; unless they are top Snipers such as mercenaries. The Sniper utilizes advanced shooting techniques that allows extremely accurate shooting without Match grade accuracy. That is due to the round causing extreme damage to a person rather than shooting a target. The damage to the body allows some approximately 1"- 2" deviations; or inaccuracy, of the shot.
* CounterSnipers: A CounterSniper is a Sniper that utilizes much more advanced techniques than a standard Sniper. . The CounterSniper not only knows Sniper techniques; but, advanced techniques utilized against Snipers.
The CounterSniper will locate a Snier; then, shoot a round close to the Sniper. He will not hit the Sniper usually. The CounterSniper; then, watches the movements of the Sniper to learn the Sniper's characteristics, escape routes; and, other data regarding the Sniper in case the hit from the CounterSniper is not fatal. The CounterSniper; then, allows the Sniper to shoot at him/ her while watching with a wide view scope. The CounterSniper moves slightly to one side after the Sniper fires. When the projectile strikes the surface of the Earth a few inches away, the CounterSnier knows the weight of the projectile; as well as the accuracy and other data. When the CounterSniper hears the gun blast He/ She knows the caliber of the Sniper weapon. He/ She knows the capabilities of the Sniper weapon; as well as all data regarding the gun as well as the Sniper does. The CounterSniper may fire 3-10 rounds at the Sniper to allow learning the Sniper's methods. That terminates future escape; and potential surprise attacks; as well as allows the CounterSniper to know if other Snipers are in the area.
In the past, Snipers used reflections in the scope for sighting references. Since the 1970s, scopes have hoods to conceal the reflections.
Here is some data regarding guns:
* Sights: Professionals never use sights. They always observed sights to be a nuissance. Sights are very slow and awkward. I; and others, always cut off; and filed down the sights. When aiming without sights, there are 2 techniques to shooting:
[1] Top Viewing: When looking down the top of the barrel, shoot the apparent of the thickness of the barrel lower to make up for the elevation misview. Shooting only requires aiming at the target in a general view.This type of firing is very quick.
[2] Side View: When shooting long distances; or for very accurate shooting, look down the side of the barrel on your facial side. When lifting the barrel for elevation, calculate the height of the lift to distance shooting. It takes few boxes to establish correct shooting sight adjustments.
* Waist Shooting: This is an extremely accurate shooting method. When shooting from the waist, the arm is utilized as a sight. When shooting a pistol [or a rifle], aim the arm at a 90 degree angle; then raise it at no more than a 45 degree angle; for accurate shooting, and at a side angle for cross shooting if necessary.
For Shotguns shooting:
Shotguns are effective at close ranges; but may be accurate at long ranges if the shot is taken out of the gun shell; then, laid in th shell evenly to produce consistently even patterns in a target.
Shotguns are usually fired from the waist.
Videos:
Here is a video of 2 men shooting a 1" group at a 1" bullseye target at 100 yards after 4 hours training:
https://www.youtube.com/watch?v=D1U8YVWyMYY&t=34s
Shooting Postures:
Rifles:
Crossarm Stance:
https://tpwd.texas.gov/education/hunter-education/online-course/images-shooting/sittingBlackGap_DSC0113.png
Hip Rest Stance:
http://www.riflesilhouette.com/images/StandPosition.jpg
Free Arm Stance:
https://content.artofmanliness.com/uploads/2011/05/shootingrifle.jpg
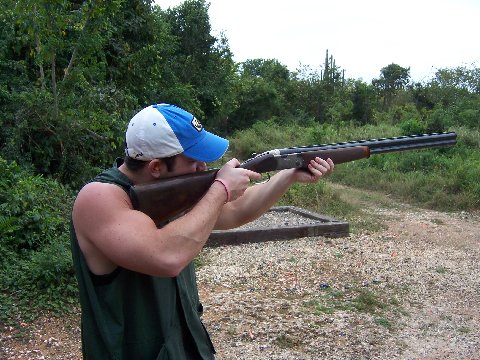
Low Elbow Stance:
Pistols:
Front Grip Stance:
http://www.stag-prague.com/images/katakt/Magnum1.JPG
Bottom Grip:

Hip Shot:
Rifle:

NOTE: Look at the 90* angle of the shooting arm.
Pistol:

NOTE: See how the arm is extended to allow accurate aiming.
To be Continued
No comments:
Post a Comment